預計用py local server與前導vue來進行
主畫面
參考並照抄
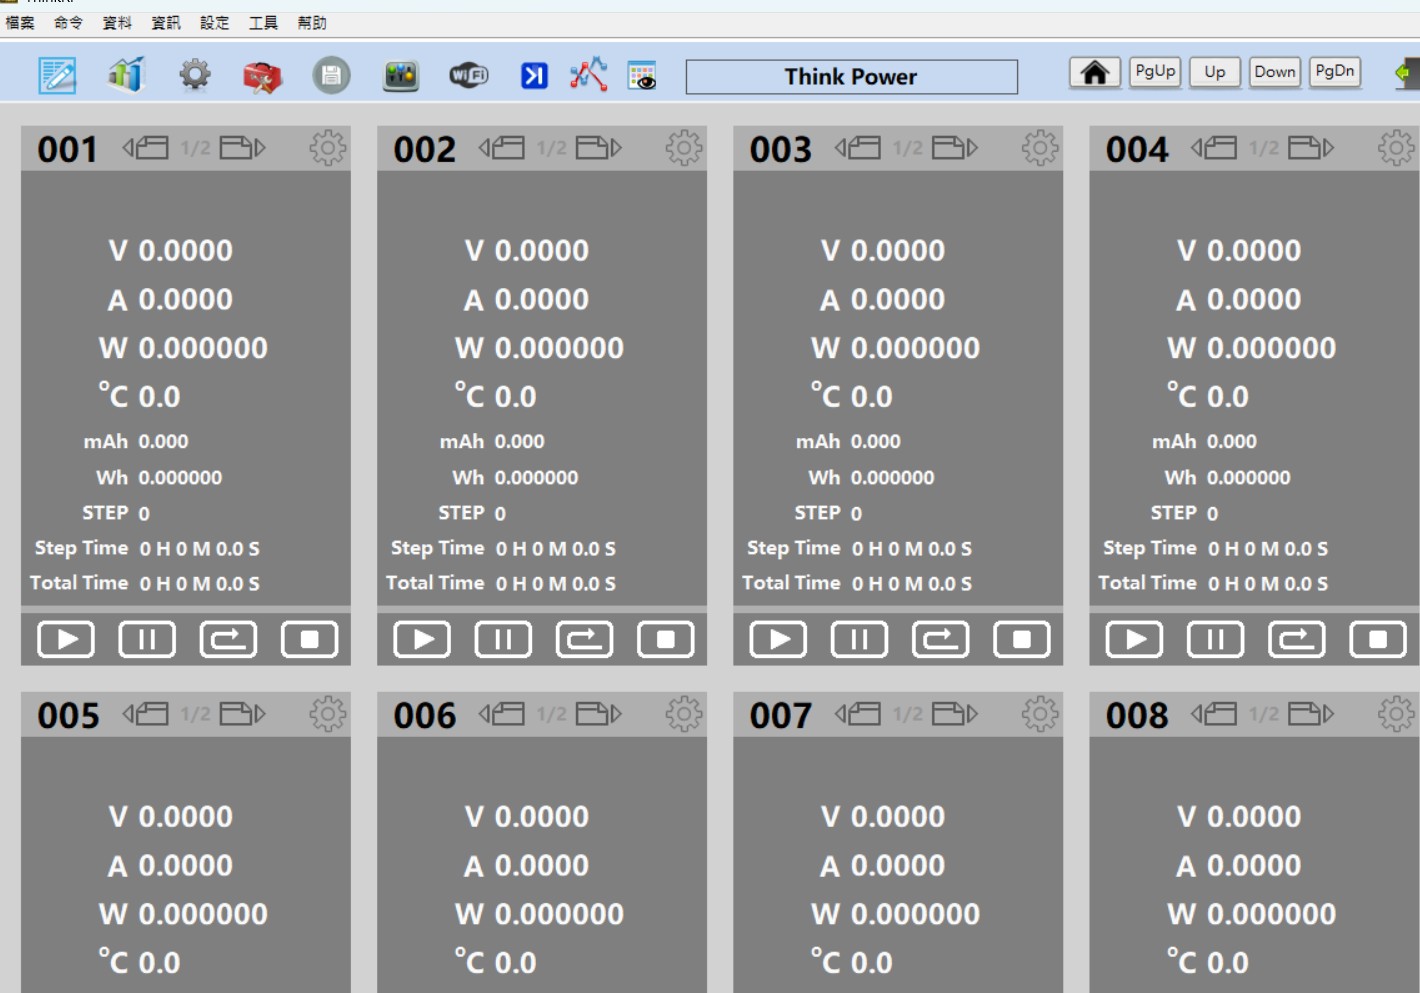 可以用新增的方式新增IP進去主畫面
進去後直接Webhook串接數據 實時監控
綠色通 藍色運行 紅色Alarm 灰色離線
可以用新增的方式新增IP進去主畫面
進去後直接Webhook串接數據 實時監控
綠色通 藍色運行 紅色Alarm 灰色離線
每個通道會有兩種控制
第一種
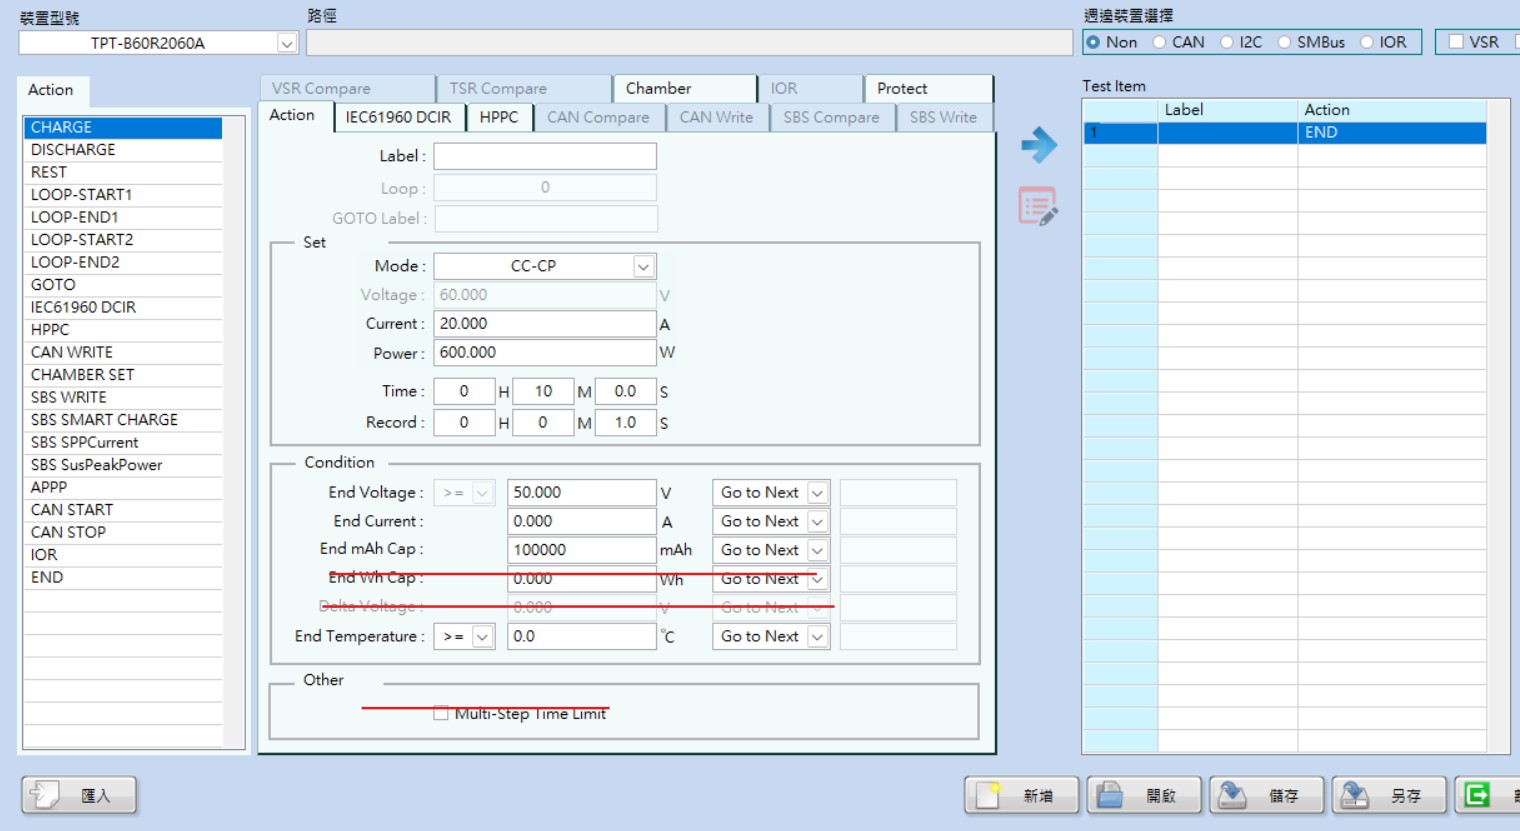
單工步執行 參考並照抄下列畫面
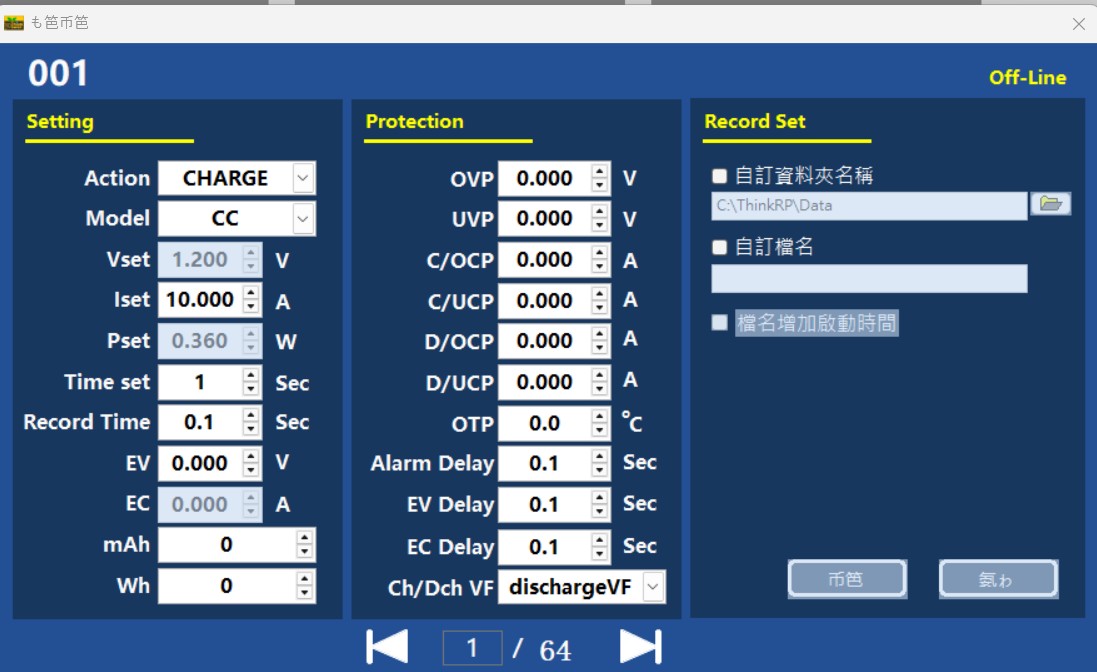 一樣會造著不同CC CV CP 然填入不同的數據
只是現在沒有mAh
EV & EC Deley 只有一個 Deley
Record Set新增 另外寫在pyserver功能 開啟執行序去進行存取 根據Record Time來進行
目前Record Time 多低都沒關係 但要記得提醒使用者有效區間大概0.6 sec
一樣會造著不同CC CV CP 然填入不同的數據
只是現在沒有mAh
EV & EC Deley 只有一個 Deley
Record Set新增 另外寫在pyserver功能 開啟執行序去進行存取 根據Record Time來進行
目前Record Time 多低都沒關係 但要記得提醒使用者有效區間大概0.6 sec
第二種
排程進行
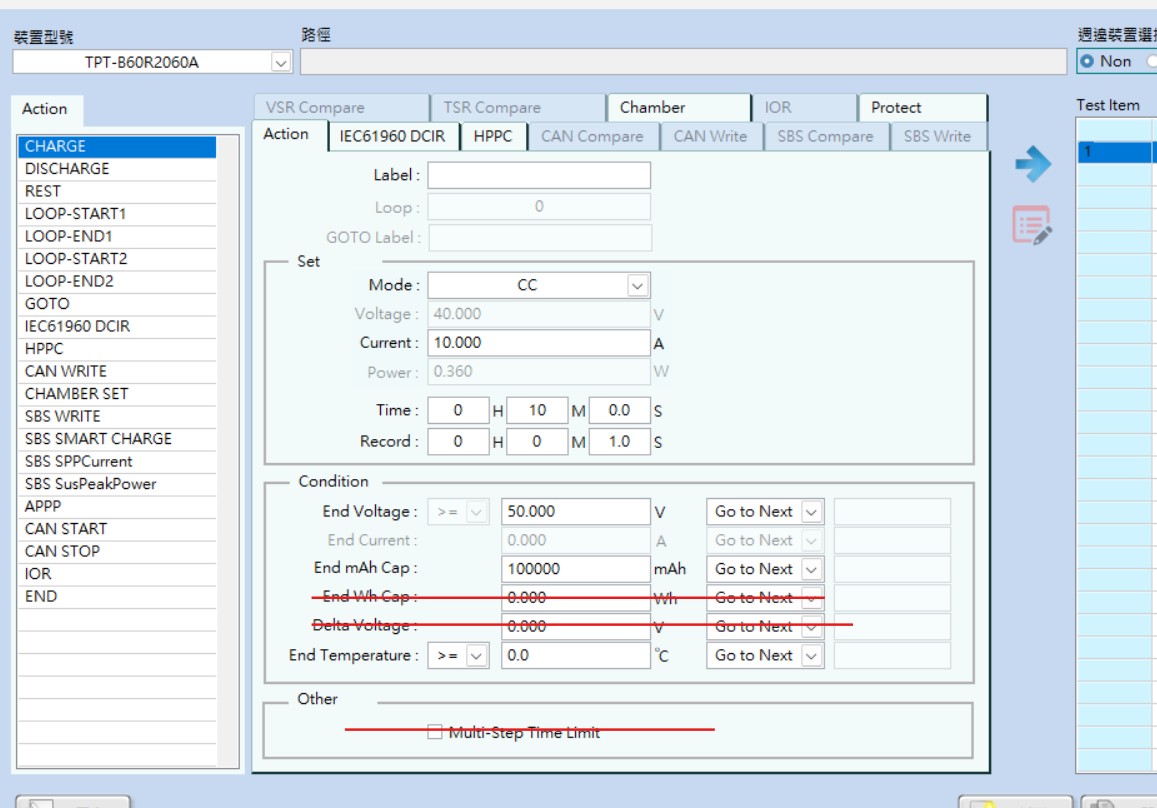
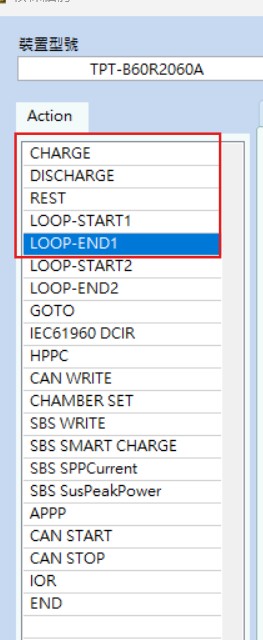 本來就有這五大類 只要造著寫入 其他不需要
畫面參考這三個 需寫入數值如Json
本來就有這五大類 只要造著寫入 其他不需要
畫面參考這三個 需寫入數值如Json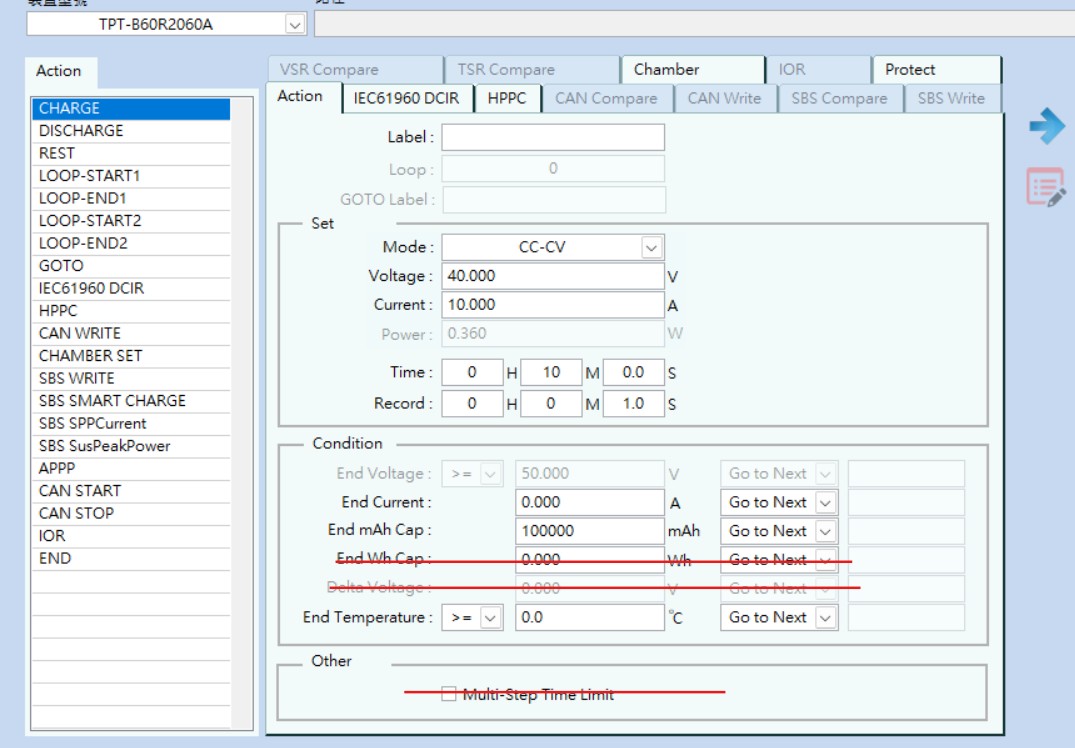
[
  {
    "step_id": 1,
    "action": "CHARGE",
    "mode": "CC",
    "i_set": 20.0,
    "v_set": null,
    "p_set": null,
    "end_voltage_op": ">=",
    "end_voltage": 51.0,
    "end_current_op": null,
    "end_current": null,
    "step_time": 3600.0,
    "end_capacity_mah": 20000.0,
    "end_condition_duration": 3.0,
    "next_move": "NEXT"
  },
  {
    "step_id": 2,
    "action": "CHARGE",
    "mode": "CC-CV",
    "i_set": 20.0,
    "v_set": 51.4,
    "p_set": null,
    "end_voltage_op": null,
    "end_voltage": null,
    "end_current_op": "<=",
    "end_current": 15.0,
    "step_time": 7200.0,
    "end_capacity_mah": 20000.0,
    "end_condition_duration": 5.0,
    "next_move": "NEXT"
  },
  {
    "step_id": 3,
    "action": "LOOP_START",
    "loop_id": "LOOP_A",
    "loop_count": 2,
    "next_move": "NEXT"
  },
  {
    "step_id": 4,
    "action": "CHARGE",
    "mode": "CC-CP",
    "i_set": 20.0,
    "v_set": null,
    "p_set": 1000.0,
    "end_voltage_op": ">=",
    "end_voltage": 51.5,
    "end_current_op": "<=",
    "end_current": 1.0,
    "step_time": 3600.0,
    "end_capacity_mah": 20000.0,
    "end_condition_duration": 3.0,
    "next_move": "NEXT"
  },
  {
    "step_id": 5,
    "action": "REST",
    "mode": "NONE",
    "step_time": 10.0,
    "next_move": "NEXT"
  },
  {
    "step_id": 6,
    "action": "DISCHARGE",
    "mode": "CC",
    "i_set": 20.0,
    "v_set": null,
    "p_set": null,
    "end_voltage_op": "<=",
    "end_voltage": 50.4,
    "end_current_op": null,
    "end_current": null,
    "step_time": 3600.0,
    "end_capacity_mah": 20000.0,
    "end_condition_duration": 3.0,
    "next_move": "NEXT"
  },
  {
    "step_id": 7,
    "action": "DISCHARGE",
    "mode": "CC-CV",
    "i_set": 20.0,
    "v_set": 50.3,
    "p_set": null,
    "end_voltage_op": null,
    "end_voltage": null,
    "end_current_op": "<=",
    "end_current": 40.0,
    "step_time": 7200.0,
    "end_capacity_mah": 20000.0,
    "end_condition_duration": 5.0,
    "next_move": "NEXT"
  },
  {
    "step_id": 8,
    "action": "DISCHARGE",
    "mode": "CC-CP",
    "i_set": 30.0,
    "v_set": null,
    "p_set": 1000.0,
    "end_voltage_op": "<=",
    "end_voltage": 50.25,
    "end_current_op": "<=",
    "end_current": 1.0,
    "step_time": 3600.0,
    "end_capacity_mah": 20000.0,
    "end_condition_duration": 3.0,
    "next_move": "NEXT"
  },
  {
    "step_id": 9,
    "action": "REST",
    "mode": "NONE",
    "step_time": 10.0,
    "next_move": "NEXT"
  },
  {
    "step_id": 10,
    "action": "LOOP_END",
    "loop_id": "LOOP_A",
    "next_move": "NEXT"
  },
  {
    "step_id": 11,
    "action": "END"
  }
]
空值部分程序會處理
下列為保護點設定 一個排程備一個 所以預計會改JSON 多家另外一框
[
{
"OVP":1...,
"OCP":2...,
...
}
]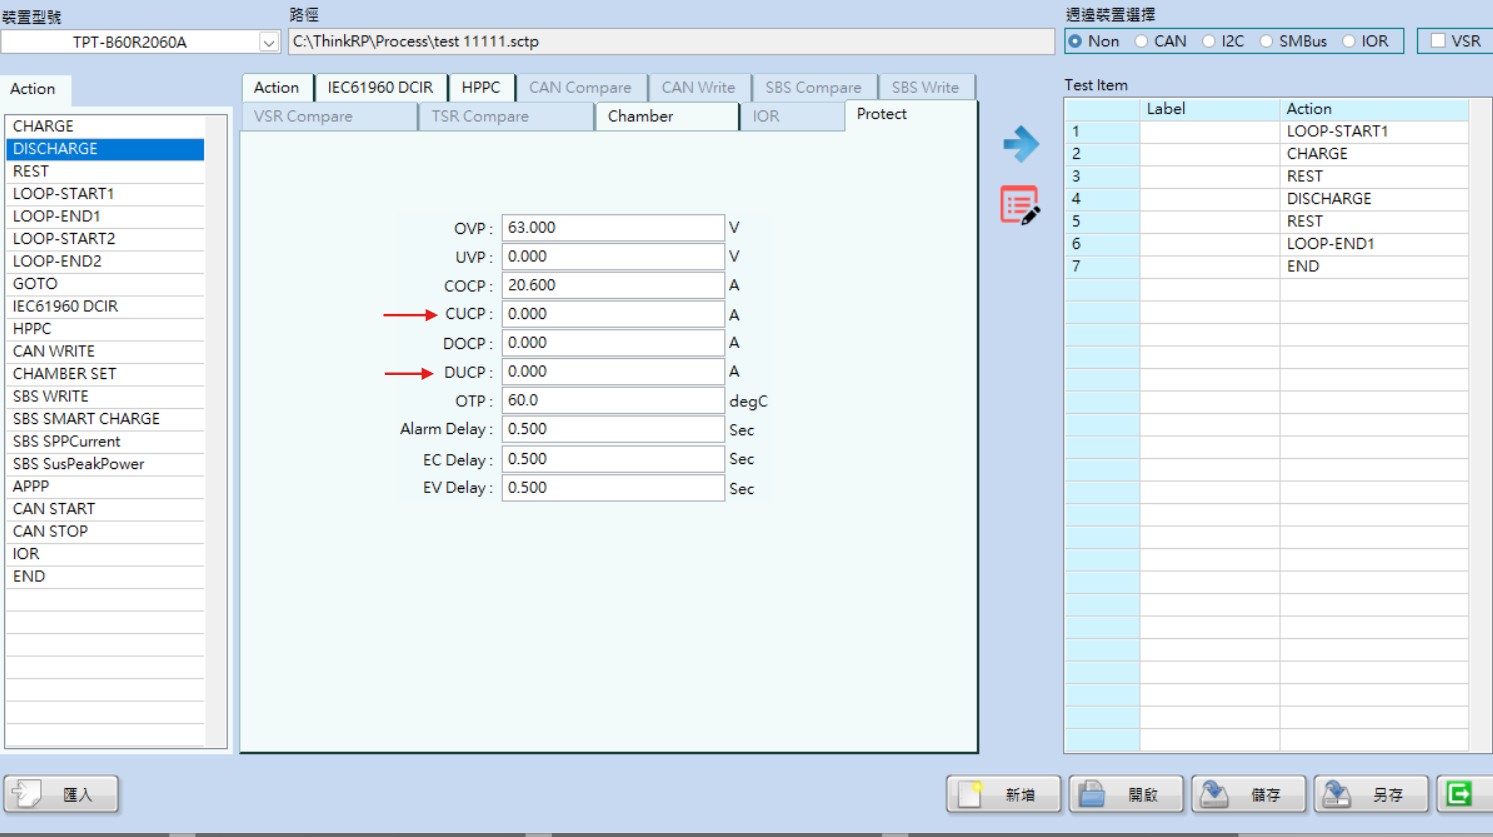 不同的是我們只有 OVP OCP OPP UVP UCP
延遲時間只有 Alarm Delay 跟 Deley(整合EC與EV)
不同的是我們只有 OVP OCP OPP UVP UCP
延遲時間只有 Alarm Delay 跟 Deley(整合EC與EV)
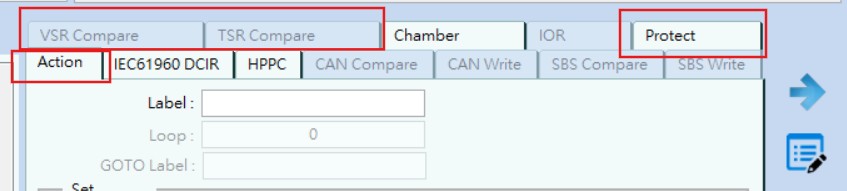 TAB仿照上面 主要先進行Action 與 Protect 保留VSR TSR
先串完ITECH 後續再加入HIOKI(在辦公室也比較好加)
最後再找時間 月底前先進行整體測試
TAB仿照上面 主要先進行Action 與 Protect 保留VSR TSR
先串完ITECH 後續再加入HIOKI(在辦公室也比較好加)
最後再找時間 月底前先進行整體測試